
In this article we tackle common 3d printing problems and how to solve them. No one will stop you now with this comprehensive guide.
Table of Contents
Introduction
In the world of 3D printing, encountering problems is almost inevitable, especially for beginners.
However, understanding these common issues and knowing how to solve them is crucial for improving print quality and efficiency.
Common problems can range from bed adhesion issues to extrusion difficulties, each requiring specific troubleshooting techniques.
Developing these skills will not only enhance your 3D printing experience but also enable you to tackle new challenges with confidence.
After reading this guide, no one will be able to stop you from printing what you love and need.
Bed Adhesion Issues
Bed adhesion is one of the most critical aspects of successful 3D printing.
If the first layer of your print does not adhere properly to the print bed, it can lead to various issues such as warping or complete print failure.
Let’s delve into two primary bed adhesion problems and their solutions.
Poor Bed Adhesion
Poor bed adhesion can ruin an entire print job. It usually occurs when the filament doesn’t stick to the print bed during the initial layers. Here are some common causes and solutions:
Causes:
- Unleveled Bed: If the print bed is not leveled correctly, the filament will not adhere properly.
- Dirty Print Bed: Dust, oils, or residue can prevent proper adhesion.
- Incorrect Bed Temperature: Different materials require different bed temperatures for optimal adhesion.
- Incorrect First Layer Height: If the nozzle is too far from the bed, the filament won’t stick; if it’s too close, it can cause clogging.
Solutions:
- Level the Bed: Use the printer’s leveling feature or manually adjust the bed to ensure it is perfectly level.
- Clean the Bed: Wipe the bed with isopropyl alcohol to remove any dust, oil, or residue.
- Adjust Bed Temperature: Ensure the bed temperature matches the filament’s requirements. For example, PLA typically adheres well at 60°C, while ABS may require around 100°C.
- Calibrate First Layer Height: Adjust the nozzle height to ensure the filament is properly squished onto the bed without causing blockages.
Warping
Warping occurs when the edges of a print curl upwards, detaching from the bed. This problem is particularly common with materials like ABS and can compromise the structural integrity of the print.
Causes:
- Rapid Cooling: If the print cools too quickly, the material contracts and warps.
- Inadequate Bed Adhesion: Poor initial adhesion can lead to warping as the print progresses.
- Ambient Temperature: Cold environments can exacerbate warping issues.
Solutions:
- Use a Heated Bed: Maintaining a consistent bed temperature can prevent the bottom layers from cooling too quickly. For ABS, a bed temperature of 100°C is recommended.
- Apply Adhesives: Use a glue stick, blue painter’s tape, or specialized 3D printing adhesives to improve bed adhesion.
- Enclosure: Printing in an enclosed space helps maintain a stable temperature, reducing the risk of warping.
- Use Brims or Rafts: Adding a brim or raft increases the surface area of the print in contact with the bed, enhancing adhesion and reducing warping.
By understanding and addressing these bed adhesion issues, you can significantly improve the success rate and quality of your 3D prints.
Extrusion Problems
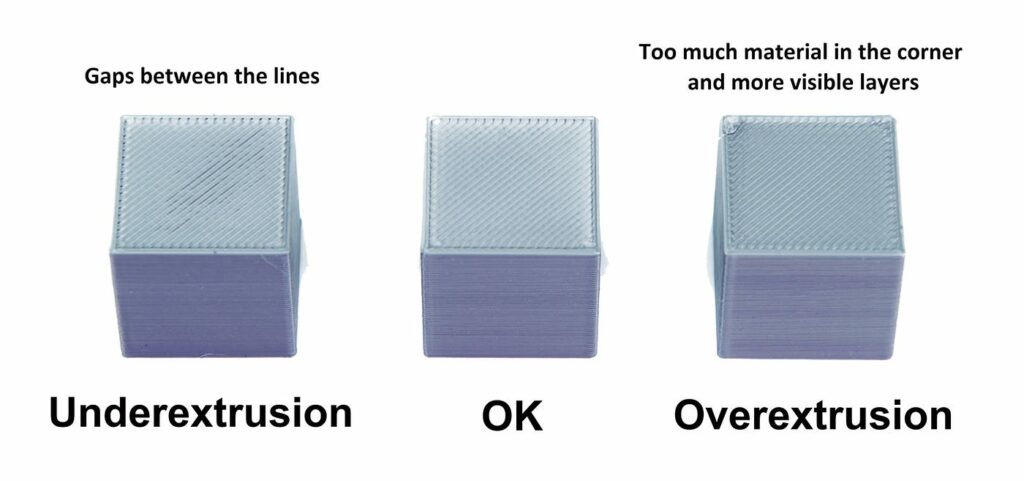
Extrusion problems are a frequent challenge in 3D printing, affecting the quality and consistency of the printed object.
These issues often stem from improper filament flow through the nozzle, leading to either under-extrusion or over-extrusion.
Understanding these problems and their solutions is vital for achieving high-quality prints.
Under-Extrusion
Under-extrusion occurs when the printer is not extruding enough filament, resulting in gaps, missing layers, or weak prints. It can severely compromise the structural integrity and aesthetic quality of your prints.
Causes:
- Clogged Nozzle: Residue or debris in the nozzle can restrict filament flow.
- Inconsistent Filament Diameter: Variations in filament diameter can cause inconsistent extrusion.
- Low Extruder Temperature: Insufficient temperature can prevent the filament from melting properly.
- Extruder Gear Slippage: Worn-out or loose gears can fail to push the filament through consistently.
Solutions:
- Clean the Nozzle: Regularly clean the nozzle to remove any debris or residue.
- Check Filament Diameter: Use high-quality filament with consistent diameter.
- Adjust Extruder Temperature: Ensure the extruder temperature is appropriate for the filament type.
- Inspect Extruder Gears: Check and replace worn-out gears and ensure they are properly tightened.
Over-Extrusion
Over-extrusion happens when too much filament is extruded, causing blobs, oozing, or thick layers.
This can lead to poor surface quality and dimensional inaccuracies.
Causes:
- High Extruder Temperature: Excessive temperature can cause the filament to flow too freely.
- Incorrect Flow Rate Settings: Setting the flow rate too high can lead to over-extrusion.
- Excessive Retraction Settings: High retraction settings can cause filament to ooze when the nozzle moves.
Solutions:
- Lower Extruder Temperature: Adjust the temperature to a level that allows smooth extrusion without excessive flow.
- Calibrate Flow Rate: Fine-tune the flow rate settings in your slicer software.
- Optimize Retraction Settings: Adjust retraction settings to minimize oozing and stringing without affecting extrusion.
Layer Shifting and Misalignment
Layer shifting and misalignment can ruin prints by causing layers to be misplaced, resulting in a skewed or twisted object.
These issues often stem from mechanical or software problems that disrupt the precise movement of the printer’s components.
Causes of Layer Shifting
Layer shifting can be caused by various factors, including mechanical failures or software glitches.
Causes:
- Loose Belts or Pulleys: Belts or pulleys that are not tight enough can slip and cause layers to shift.
- Mechanical Obstructions: Objects or debris in the printer’s path can obstruct movement.
- Stepper Motor Issues: Faulty stepper motors can cause inconsistent movements.
- High Print Speed: Excessive print speed can lead to skipped steps and shifting.
Solutions:
- Tighten Belts and Pulleys: Ensure all belts and pulleys are tight and secure.
- Clear Obstructions: Regularly check and clear any debris or objects in the printer’s path.
- Inspect Stepper Motors: Test and replace any faulty stepper motors.
- Adjust Print Speed: Reduce the print speed to prevent skipping steps and improve accuracy.
Fixing Misalignment
Misalignment often occurs when the printer’s components are not properly calibrated or aligned, causing layers to be printed at incorrect positions.
Solutions:
- Calibrate Printer: Regularly calibrate your printer to ensure all components are correctly aligned.
- Check Frame and Axis Alignment: Ensure the printer’s frame and axes are straight and properly aligned.
- Update Firmware: Keep your printer’s firmware up to date to avoid software-related misalignments.
By addressing these extrusion problems and ensuring proper alignment, you can enhance the precision and reliability of your 3D prints.
Stringing and Oozing

Stringing and oozing are common issues in 3D printing that result in thin, unwanted strands of filament appearing between parts of the print. These problems can affect the surface quality and overall aesthetics of your prints.
Understanding Stringing
Stringing occurs when small strings of filament are left behind as the nozzle moves across open spaces. This is often due to filament oozing out of the nozzle during travel moves.
Causes:
- High Print Temperature: Excessive heat can cause the filament to become too fluid, leading to stringing.
- Improper Retraction Settings: Insufficient retraction can leave filament oozing during non-print moves.
- Moist Filament: Filament that has absorbed moisture can produce more stringing.
Solutions:
- Lower Print Temperature: Reduce the print temperature to a level that minimizes filament flow without compromising print quality.
- Optimize Retraction Settings: Increase the retraction distance and speed to pull the filament back into the nozzle during travel moves.
- Dry Filament: Store filament in a dry environment or use a filament dryer to remove moisture.
Controlling Oozing
Oozing occurs when filament leaks out of the nozzle during printing, causing blobs and unwanted deposits on the print surface.
Causes:
- High Retraction Settings: Excessive retraction can cause pressure buildup, leading to oozing when the nozzle resumes printing.
- Poor Nozzle Maintenance: A dirty or worn nozzle can contribute to inconsistent extrusion and oozing.
- Incorrect Flow Rate: An overly high flow rate can cause the filament to ooze out uncontrollably.
Solutions:
- Adjust Retraction Settings: Fine-tune retraction settings to balance between preventing stringing and minimizing oozing.
- Clean the Nozzle: Regularly clean the nozzle to ensure smooth and consistent filament flow.
- Calibrate Flow Rate: Ensure the flow rate is correctly set for the filament being used.
Print Quality Issues
Print quality issues can arise from various factors, affecting the surface finish, strength, and dimensional accuracy of your 3D prints. Addressing these issues involves careful calibration and optimization of your printer settings.
Poor Surface Finish
A poor surface finish can result in rough, uneven, or unattractive prints. This issue can be caused by several factors, including incorrect settings or filament issues.
Causes:
- Layer Height: Using a large layer height can result in a rough surface.
- Print Speed: High print speeds can cause vibrations and reduce surface quality.
- Filament Quality: Low-quality filament can produce inconsistent extrusion and poor surface finish.
Solutions:
- Reduce Layer Height: Use a smaller layer height for a smoother surface finish.
- Adjust Print Speed: Lower the print speed to reduce vibrations and improve surface quality.
- Use High-Quality Filament: Invest in high-quality filament for more consistent and reliable prints.
Inconsistent Layers
Inconsistent layers can manifest as variations in layer thickness, leading to weak points and aesthetic issues in your prints.
Causes:
- Extruder Issues: A malfunctioning extruder can cause inconsistent filament flow.
- Temperature Fluctuations: Variations in extruder temperature can affect filament extrusion.
- Mechanical Problems: Loose belts or pulleys can cause irregular layer deposition.
Solutions:
- Maintain Extruder: Regularly inspect and maintain the extruder to ensure consistent filament flow.
- Stabilize Temperature: Ensure the extruder maintains a consistent temperature throughout the print.
- Check Mechanical Components: Tighten belts and pulleys to prevent mechanical issues from affecting layer consistency.
By understanding and addressing these stringing, oozing, and print quality issues, you can significantly enhance the appearance and performance of your 3D prints.
Filament Problems
Filament problems can greatly impact the quality of your 3D prints. Issues such as filament jams and moisture can disrupt the printing process and result in failed prints. Understanding how to identify and solve these problems is essential for maintaining smooth and successful printing operations.
Filament Jams
Filament jams occur when the filament gets stuck or clogged in the extruder, preventing it from being fed through the nozzle.
This can halt the printing process and potentially damage your extruder.
Causes:
- Nozzle Clogs: Debris or residual filament in the nozzle can cause blockages.
- Poor Filament Quality: Inconsistent filament diameter or impurities can lead to jams.
- Excessive Retraction: High retraction settings can cause filament to get stuck in the nozzle.
Solutions:
- Clean the Nozzle: Regularly clean the nozzle to remove any debris or residual filament.
- Use High-Quality Filament: Ensure you use filament with a consistent diameter and free of impurities.
- Adjust Retraction Settings: Lower retraction settings to prevent filament from getting stuck in the nozzle.
Moisture in Filament
Moisture can be a significant problem for filament, especially for hygroscopic materials like Nylon and ABS.
Absorbed moisture can cause poor print quality and filament degradation on any material, even PLA.
Causes:
- High Humidity Environment: Storing filament in a humid environment can lead to moisture absorption.
- Improper Storage: Leaving filament exposed to air can cause it to absorb moisture over time.
Solutions:
- Dry the Filament: Use a filament dryer or oven to remove moisture from the filament before printing.
- Proper Storage: Store filament in airtight containers with desiccants to keep it dry.
Temperature-Related Issues
Temperature plays a crucial role in 3D printing. Inconsistent or incorrect temperatures can lead to various printing problems, including poor adhesion, warping, and print failures. Proper temperature management is essential for achieving high-quality prints.
Temperature Fluctuations
Temperature fluctuations can cause inconsistent extrusion and poor layer adhesion, resulting in defective prints.
Causes:
- Inconsistent Heating: Variations in the printer’s heating element can cause temperature fluctuations.
- Poor Thermal Management: Insufficient cooling or heating can lead to unstable temperatures.
- Environmental Factors: Ambient temperature changes can affect the printer’s temperature stability.
Solutions:
- Ensure Stable Heating: Check and maintain the heating element to ensure consistent temperature.
- Improve Thermal Management: Use proper cooling and heating techniques to maintain stable temperatures.
- Control Environment: Keep the printer in a stable temperature environment to minimize external temperature variations.
Overheating
Overheating can cause filament to flow excessively, leading to issues such as stringing, oozing, and poor print quality.
Causes:
- High Extruder Temperature: Excessive extruder temperature can cause the filament to overheat.
- Inadequate Cooling: Insufficient cooling of the printed layers can result in overheating.
Solutions:
- Lower Extruder Temperature: Adjust the extruder temperature to a suitable level for the filament.
- Enhance Cooling: Use additional cooling fans or improve airflow to cool the printed layers effectively.
By addressing these filament and temperature-related issues, you can maintain consistent print quality and avoid common problems that disrupt the 3D printing process.
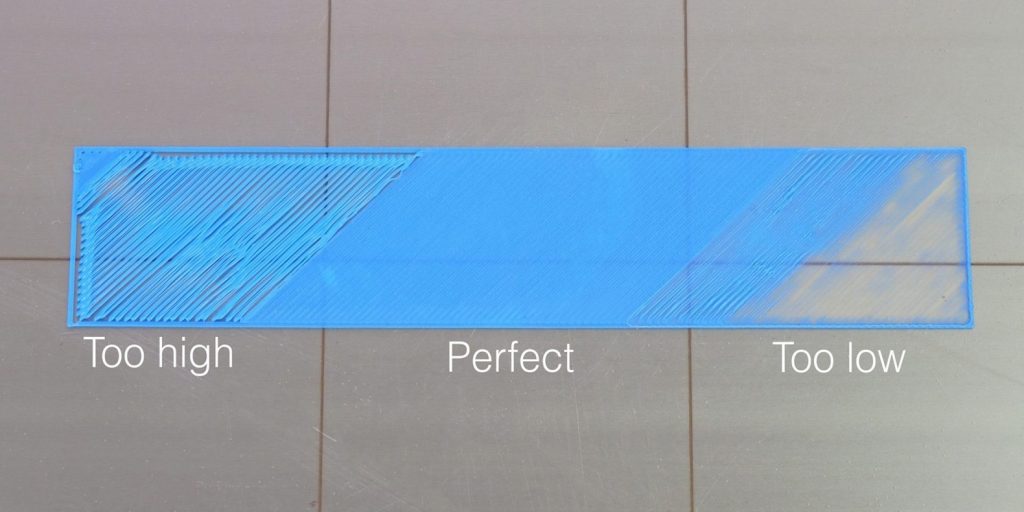
Calibration and Maintenance
Regular calibration and maintenance are crucial for ensuring the consistent performance and longevity of your 3D printer. Neglecting these aspects can lead to various issues that affect print quality and reliability.
Importance of Regular Calibration
Calibration ensures that your printer’s components are correctly aligned and functioning optimally. Regular calibration can prevent many common printing problems and improve overall print quality.
Tools and Techniques for Calibration:
- Bed Leveling: Use the printer’s leveling feature or manually adjust the bed to ensure it is perfectly level.
- Extruder Calibration: Measure and adjust the extruder steps per millimeter (E-steps) to ensure accurate filament extrusion.
- Axis Calibration: Check and calibrate the X, Y, and Z axes to ensure accurate movement and positioning.
Maintenance Tips for Consistent Performance
Regular maintenance helps keep your printer in top condition and prevents mechanical failures that can lead to print issues.
Essential Maintenance Tasks:
- Clean the Nozzle: Regularly clean the nozzle to prevent clogs and ensure smooth extrusion.
- Lubricate Moving Parts: Apply lubricant to the printer’s moving parts, such as rods and bearings, to reduce friction and wear.
- Check Belts and Pulleys: Ensure belts and pulleys are tight and free from wear to maintain accurate movements.
- Inspect Wiring: Regularly check the printer’s wiring for any signs of damage or loose connections.
Regular Printer Maintenance Regular printer maintenance is vital for ensuring consistent performance and preventing unexpected breakdowns.
Essential Maintenance Tasks
- Nozzle Cleaning: Regularly clean the nozzle to prevent clogs and ensure smooth filament flow.
- Lubrication: Lubricate moving parts, such as rods and bearings, to reduce friction and wear.
- Belt Tension: Check and adjust the tension of belts to prevent slipping and ensure accurate movement.
- Firmware Updates: Keep the printer’s firmware updated to benefit from the latest features and bug-fixes.
By incorporating these calibration and maintenance practices into your routine, you can enhance the reliability and longevity of your 3D printer, ensuring consistent and high-quality prints.
Conclusion
3D printing is a complex but highly rewarding technology that offers endless possibilities for creation and innovation.
Understanding and addressing common issues such as bed adhesion, extrusion problems, stringing, and filament issues are essential steps in mastering this craft.
Regular calibration and maintenance of your 3D printer ensure consistent performance and prolong its lifespan, allowing you to produce high-quality prints reliably.
You don’t want to print parts that may broke in the worst times. Especially car parts, imagine what could happen.
By developing a thorough understanding of these common problems and their solutions, you can enhance your 3D printing experience and tackle new challenges with confidence.
Whether you are a beginner or an experienced user, continuous learning and experimentation are key to achieving the best results.
Keep exploring, stay patient, and enjoy the process of turning your ideas into reality with 3D printing.